Connection
This document describes the information needed by a client to be able to establish a connection to a Volt, how that information is persisted in a configuration file by the Volt4 client libraries, and how to use a client configuration file to establish a connection to a Volt4 using the Volt4 CLI.
Create a client connection
The easiest way to obtain a connection configuration is to use the cli ‘auth’ command.
Note this will create a new identity and client configuration on the target Volt, if you want to obtain the configuration for an existing identity, see below.
Obtain a client connection
If you have a connection to the target Volt4 configured in the fusebox, you can use this to quickly obtain a client configuration file.
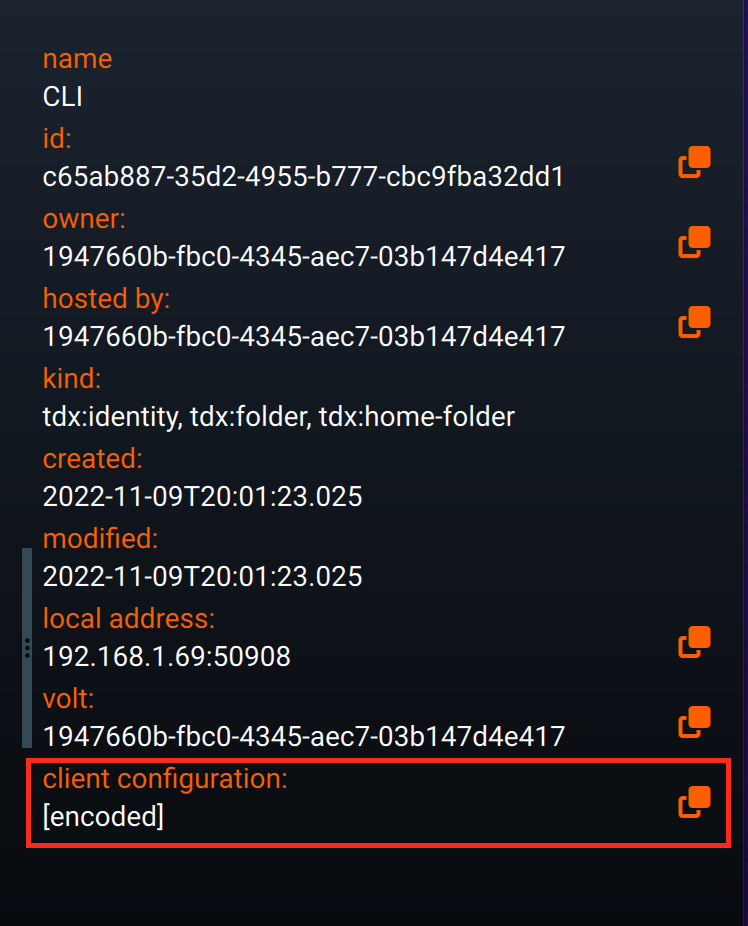
Select the identity you want to use for the client in the Explorer pane on the left side of the fusebox. Then use the ‘copy to clipboard’ button next to the ‘client configuration’ detail in the right-hand panel, as highlighted in the image below:
Client connection information
Two pieces of information are required for a client to be able to connect to a Volt4 to access resources or services:
-
The client credentials. The client credentials identify the client. As far as the target Volt4 is concerned, this is primarily made up of the client’s public key. However, in order to be able to prove possession of the key to the target Volt, the private key will be required by the client library to initiate the TLS handshake or sign a JWT. The client credentials are stored in the
credentialproperty, described below. -
The target Volt4 configuration. The Volt4 configuration identifies the target Volt. It includes a unique identitifier (DID), address and public key. See the Volt configuration reference section for a full description and details of how to obtain a Volt4 configuration. The Volt configuration is stored in the
voltproperty, described below.
Note that only the public portion of the client key is sent to the Volt, the private key is never seen by the Volt.
The basic structure of a client configuration is shown below:
{ "client_name": "Alice", "credential": { "key": "<PEM-encoded private key>" }, "volt": { <paste a Volt configuration object here> }}challenge_code
If present it represents a challenge code that can be signed and presented when attempting to authenticate with a Volt. Some tdxVolts may require this as part of the initial authentication flow to demonstrate to the Volt4 that you have some secret, pre-shared information. You may not need to do this if the Volt4 already knows your public key, or you have other verifiable credentials you can present these in the authentication request.
Client configuration file
All the current Volt4 client libraries support using a file to store a client configuration in the JSON format described here.
It is not obligatory for clients or applications to use this format. The configuration details can be specified as a plain object and stored in whatever method suits.
Populating the client key
Note that unless the full client key is stored in the Volt4, it will be necessary to manually populate the key property of the JSON that is copied to the clipboard using the method described above.
The example below shows the configuration copied from an identity that doesn’t have the key stored in the Volt4. As you can see, the key property has a placeholder (<**** INSERT PEM-FORMAT KEY HERE ****>) that must be replaced with the actual PEM-format private key corresponding to this client.
{ "volt": { "id": "did:volt:4801dd12-410d-46d4-84f8-efb0ba609085", "display_name": "Alice", "address": "192.168.1.195:52991", "http_address": "http://192.168.1.195:52992", "public_key": "-----BEGIN PUBLIC KEY-----\nMCowBQYDK2VwAyEA4Y+OuHQWe2P36Vh/8NptLxBexYPO3swzJUGSO43NYD4=\n-----END PUBLIC KEY-----\n", "fingerprint": "4TdcMmoKMvZAQZZjMfjo3PSaySvFCVvEx98t1vCKd2UP", "ca_pem": "-----BEGIN CERTIFICATE-----\nMIIB6DCCAZqgAwIBAgIESumM1TAFBgMrZXAwejELMAkGA1UEBhMCR0IxFDASBgNV\nBAcMC1NvdXRoYW1wdG9uMRowGAYDVQQKDBFucXVpcmluZ01pbmRzIEx0ZDE5MDcG\nA1UEAwwwY2EuZGlkOnZvbHQ6NDgwMWRkMTItNDEwZC00NmQ0LTg0ZjgtZWZiMGJh\nNjA5MDg1MB4XDTI0MDgwODA1NDU1OVoXDTI1MDgwODA1NDYwMFowejELMAkGA1UE\nBhMCR0IxFDASBgNVBAcMC1NvdXRoYW1wdG9uMRowGAYDVQQKDBFucXVpcmluZ01p\nbmRzIEx0ZDE5MDcGA1UEAwwwY2EuZGlkOnZvbHQ6NDgwMWRkMTItNDEwZC00NmQ0\nLTg0ZjgtZWZiMGJhNjA5MDg1MCowBQYDK2VwAyEA4Y+OuHQWe2P36Vh/8NptLxBe\nxYPO3swzJUGSO43NYD6jQjBAMA8GA1UdEwEB/wQFMAMBAf8wDgYDVR0PAQH/BAQD\nAgEGMB0GA1UdDgQWBBR/nhaQma18xACBAFTD9qIKoFI/QDAFBgMrZXADQQCV3t2S\nGOTHeRte0RvDXbI7f8mLdUFTCXoyaBEOdQoNPghsEV9LzOKQZ+XKQd9S3EoZRcg9\nOlxd098oM4Z0auwN\n-----END CERTIFICATE-----\n" }, "client_name": "Bob", "credential": { "identity_did": "did:volt:fb493b5d-8a7a-44c5-930b-8f24b0cf8104", "challenge_code": "d0adcg6K2QR905Rms8iXTlksL6OD1KOWBxTK7wxPI", "key": "<**** INSERT PEM-FORMAT KEY HERE ****>" }}Test the connection
Assuming you have created a client configuration file, you can now use it to connect to a Volt.
We can use the Volt CLI to issue a request to the Volt. Here we ask the Volt4 to list all the resources in the clients ‘Home’ folder (indicated by ’.’). This may yield no results if you have only just bound to the Volt.
volt list . -c client.config.jsonNow try uploading a file to the home folder.
volt upload path/to/some/file . -c client.config.jsonAnd then list the resources again:
volt list . -c client.config.jsonThe Volt4 CLI will look for a client configuration file named `volt.config.json` in the `.volt` folder of the home directory if none is specified on the command line. There is no need to specify the `-c client.config.json` parameter if you have stored the configuration in the default location.
Relay connections
The discussion so far has related to peer-to-peer connections. However in many scenarios it will be necessary to connect to a Volt that is not on the same local network as the client, and may not be accessible via the wider internet because it is behind a firewall.
In order to be able to connect to remote Volts in these scenarios you can utilise the concept of a Relay Volt, which is described in more detail here.
The first step is to establish the configuration of the Relay Volt you would like to use.
It is then a case of adding another Volt configuration object describing the Relay Volt as a sub-property of the target volt configuration. This relay property takes the same format as the standard Volt configuration:
{ "client_name": "your friendly name", "volt": { "id": "<volt DID>", "ca_pem": "<volt CA certificate>", "relay": { "id": "<Relay volt DID>", "ca_pem": "<Relay volt CA certificate>" } }}You can use the same discovery options as described above for obtaining a Volt configuration, for example, via a DID lookup or a HTTP discovery:
{  "client_name": "your friendly name",  "volt": {    ...    "relay": "did:tdx:349970a5-9f3a-4ac6-aef3-75881e7b87e7"  }}
{  "client_name": "your friendly name",  "volt": {    ...    "relay": "https://tdxvolt.com"  },}
The addition of the `relay` property is the only addition that is required to a standard client configuration to force the client libraries to connect via a Relay Volt. However if the configuration has previously been used to bind locally, it may be necessary to delete the `credential.cert` property to force the client library to initialise the Relay parameters correctly.
Appendix
Client configuration definition
The JSONSchema definition of the Volt client configuration object is shown below.
Note that the client_name and crytpo properties describe the client and its credentials, and the remainder of the
document (the volt property) is simply an instance of a Volt4 configuration object.
{ "$schema": "https://json-schema.org/draft/2019-09/schema", "$id": "https://tdxvolt.com/schemas/volt-client-connection", "type": "object", "title": "Volt client connection schema", "required": ["client_name", "credential", "volt"], "properties": { "client_name": { "type": "string", "title": "A human-readable name of the client.", "examples": ["Alice"] }, "credential": { "type": "object", "title": "The cryptographic credentials identifying the client.", "required": ["identity_did", "key"], "properties": { "identity_did": { "type": "string", "title": "The UUID assigned to the client by the Volt during the binding phase.", "examples": ["c65ab887-35d2-4955-b777-cbc9fba32dd1"] }, "challenge_code": { "type": "string", "title": "The SHA256 digest of the Volt challenge code. Optional.", "examples": ["w6uP8Tcg6K2QR905Rms8iXTlksL6OD1KOWBxTK7wxPI="] }, "key": { "type": "string", "title": "The PEM-encoded key of the client. This can be encrypted.", "examples": [ "-----BEGIN ENCRYPTED PRIVATE KEY-----\nMIIFHDBOBgkqhkiG9w0BBQ0wQTApBgkqhkiG9w0BBQwwHAQInAzvld0a3a4CAggA\nMAwGCCqGSIb3DQIJBQAwFAYIKoZIhvcNAwcECKXsm0+tgmFHBIIEyD+ka/hmH18r\nUfMz8iBPAyD1brAIo5ePF9RYGC95doK6hsKG2wHkXrVPZD8Qj/xTBTpvmTIzLUPb\n4sDUK/mP3CRB2wAFC0UvD4nn0DL/MnRm6C9SzoQ/nP/vN6l1g2cgc+6UpvDhS8r/\nTiXitwO5UoflZyUHCROBdqvN8fsA+J6AjkwBgI//IKxnMTNGRlwhATjbcPRbjowy\nx1lvmMhxTmSxOwNzD5xiHw/aHx7ElFGLCNsXQteGvxN0EEh1HhKpN8i0U2kouzcw\n3FU5RodlpbVvE64SYBqFwlH9p4Sog2qWTpWHgavytyMDxrl+K/q/QJVftMk5kCv8\nr78G/4s9TrOZ3rBk0fZQ+c+EGB/zSQArEhOuFKoN3ANWeGeAZB6euNqaMmMTgk+A\n37n1sNKf56hRQMfTk/28/ZCIDhdQjI6de2DH20RHwOQv+iQSI8D/8vbNRaaDcrkP\nwBa+4c8rocBJS5+bAaydXSf3ymH5Dz4Qi1Ha1rzK27VeZyOoAdKqjj5mhYSs/zsl\n5A63XpSf00mXcRyPIVm3jXEWEK01mqJYxmfR8vFrr08U8zA+pZPiz24hSRIWflT9\n3ZKMpKfo2rUuBERHgTs1TMZ/bfl1vY8NQ7VN4SyLXXBLDGLP7XfNpQIBUs0IFk2T\nyESHa7A0kZDL9+5TZcUtpSeoTYYy1MOB8TJXPVKtvKgrLLpECYRetRIpcK4cXmTP\nhlytaZdUd0yqw+mU4Nhcu602W96U0GwQjmRhF+hBdShX1PkRMvwO7DO2H3mm/iQd\nwc1j3ZpVGFfZZXHq8oAf1LyV76vX33ah8p7k9qLAXFJKlujFadzMw4J/drC42Bva\nN1nLU1FQ3ScAgdg3POOYqLGgoLskS/spiOz/VNMlMt1oGttD+UMF7dNNO70YIqNG\n/a40IxuYX2qYaZGxWfPmh+EU6NLcWQxRWb/zQTdsnlw9YMnIyXBofNbGMOqD3VzE\nE/n1G6ejuXMBfkb7/3YuLVvHPmxi7IDyiIaAvMqyr4zYKe2eAhj0VnhwOYFz7egg\nSdvgdDID4dcgjgCZdvyDBq4eL/E5Xwzu3u3G5qA+xEJAOBBfB7p/wcJ9Eni5DW/4\nisbLVEnkKxs5Hig1M8FKeDMgHbA4lHFQEy6XqczkOpxDqcx1qJMKFTSg9tVP3xJe\nq8yNspDpNt6wtg3e8K+OD2Vr2uvJjobnelYTMlN4hDGmTzVw0uwl2n/6QF5Oc88c\nXDrAviAzEBH0KiXn3RzZ4X+SHe2jVht1l0eqxNmfObekLOOL0sYdb+fYVDzQxiqM\n2ANV+ZG53mwVvhtQneFQ2j4vyn+FEBm0eTuBRfz5MuR1x8c8/5xisBXL19rhd793\njg86IW7YJ39vs6wBh5XvOSk314DxhLK+zbJrIk9mfNuZjdwNLdfBN4bdmI83RU+W\nwYlR2pjy1nax70opXOrvq2GwLdKaX/AwJqRWvFUbp6vBln/ukSe+W/bbOjm7vHk6\neUGW1HkTqTcU5H8UsnIvkAYWaPJzFqd2A6xbO+B1SvhcrZWI+XVHmm1RVmAvuq90\nR4k1/1tt+yGqjOv+9/4R+P9tSaFpDFI3y1VSH3jMZ/tQ23A8jj78EGqvynN/cCMI\nl+TGCtIBH2kefKK/ASE0BQ==\n-----END ENCRYPTED PRIVATE KEY-----\n" ] } } }, "volt": { "type": "object", "title": "The Volt configuration information.", "properties": { "$ref": "https://tdxvolt.com/schemas/volt-configuration" } } }, "examples": [ { "client_name": "CLI", "credential": { "client_id": "c65ab887-35d2-4955-b777-cbc9fba32dd1", "key": "-----BEGIN ENCRYPTED PRIVATE KEY-----\nMIIFHDBOBgkqhkiG9w0BBQ0wQTApBgkqhkiG9w0BBQwwHAQInAzvld0a3a4CAggA\nMAwGCCqGSIb3DQIJBQAwFAYIKoZIhvcNAwcECKXsm0+tgmFHBIIEyD+ka/hmH18r\nUfMz8iBPAyD1brAIo5ePF9RYGC95doK6hsKG2wHkXrVPZD8Qj/xTBTpvmTIzLUPb\n4sDUK/mP3CRB2wAFC0UvD4nn0DL/MnRm6C9SzoQ/nP/vN6l1g2cgc+6UpvDhS8r/\nTiXitwO5UoflZyUHCROBdqvN8fsA+J6AjkwBgI//IKxnMTNGRlwhATjbcPRbjowy\nx1lvmMhxTmSxOwNzD5xiHw/aHx7ElFGLCNsXQteGvxN0EEh1HhKpN8i0U2kouzcw\n3FU5RodlpbVvE64SYBqFwlH9p4Sog2qWTpWHgavytyMDxrl+K/q/QJVftMk5kCv8\nr78G/4s9TrOZ3rBk0fZQ+c+EGB/zSQArEhOuFKoN3ANWeGeAZB6euNqaMmMTgk+A\n37n1sNKf56hRQMfTk/28/ZCIDhdQjI6de2DH20RHwOQv+iQSI8D/8vbNRaaDcrkP\nwBa+4c8rocBJS5+bAaydXSf3ymH5Dz4Qi1Ha1rzK27VeZyOoAdKqjj5mhYSs/zsl\n5A63XpSf00mXcRyPIVm3jXEWEK01mqJYxmfR8vFrr08U8zA+pZPiz24hSRIWflT9\n3ZKMpKfo2rUuBERHgTs1TMZ/bfl1vY8NQ7VN4SyLXXBLDGLP7XfNpQIBUs0IFk2T\nyESHa7A0kZDL9+5TZcUtpSeoTYYy1MOB8TJXPVKtvKgrLLpECYRetRIpcK4cXmTP\nhlytaZdUd0yqw+mU4Nhcu602W96U0GwQjmRhF+hBdShX1PkRMvwO7DO2H3mm/iQd\nwc1j3ZpVGFfZZXHq8oAf1LyV76vX33ah8p7k9qLAXFJKlujFadzMw4J/drC42Bva\nN1nLU1FQ3ScAgdg3POOYqLGgoLskS/spiOz/VNMlMt1oGttD+UMF7dNNO70YIqNG\n/a40IxuYX2qYaZGxWfPmh+EU6NLcWQxRWb/zQTdsnlw9YMnIyXBofNbGMOqD3VzE\nE/n1G6ejuXMBfkb7/3YuLVvHPmxi7IDyiIaAvMqyr4zYKe2eAhj0VnhwOYFz7egg\nSdvgdDID4dcgjgCZdvyDBq4eL/E5Xwzu3u3G5qA+xEJAOBBfB7p/wcJ9Eni5DW/4\nisbLVEnkKxs5Hig1M8FKeDMgHbA4lHFQEy6XqczkOpxDqcx1qJMKFTSg9tVP3xJe\nq8yNspDpNt6wtg3e8K+OD2Vr2uvJjobnelYTMlN4hDGmTzVw0uwl2n/6QF5Oc88c\nXDrAviAzEBH0KiXn3RzZ4X+SHe2jVht1l0eqxNmfObekLOOL0sYdb+fYVDzQxiqM\n2ANV+ZG53mwVvhtQneFQ2j4vyn+FEBm0eTuBRfz5MuR1x8c8/5xisBXL19rhd793\njg86IW7YJ39vs6wBh5XvOSk314DxhLK+zbJrIk9mfNuZjdwNLdfBN4bdmI83RU+W\nwYlR2pjy1nax70opXOrvq2GwLdKaX/AwJqRWvFUbp6vBln/ukSe+W/bbOjm7vHk6\neUGW1HkTqTcU5H8UsnIvkAYWaPJzFqd2A6xbO+B1SvhcrZWI+XVHmm1RVmAvuq90\nR4k1/1tt+yGqjOv+9/4R+P9tSaFpDFI3y1VSH3jMZ/tQ23A8jj78EGqvynN/cCMI\nl+TGCtIBH2kefKK/ASE0BQ==\n-----END ENCRYPTED PRIVATE KEY-----\n", "challenge_code": "w6uP8Tcg6K2QR905Rms8iXTlksL6OD1KOWBxTK7wxPI=" }, "volt": { "id": "1947660b-fbc0-4345-aec7-03b147d4e417", "display_name": "macBook (intel)", "address": "192.168.1.69:50908", "public_key": "-----BEGIN PUBLIC KEY-----\nMIIBIjANBgkqhkiG9w0BAQEFAAOCAQ8AMIIBCgKCAQEA435moWiFRnDK/uUQcLuw\nCv+uPILgwy+MPOUmgoQUNsZgeH2RjFZqWv4JAr+1V67EDcLwIgxjd9pdYfdeHFoG\n5Z4t7qvpbJ0GPpj4SpQiN+XufZ4h+xe5C77pxukHKdzg4KlcE1UavxkRn/hQe/jI\n3tQDl99/iy0zdrClfcGDecTJT9th563ggVGuXi+GJ8iZMc6sNsYR5vMZcL3qJgx+\nUYe9RMqY4wDkbs8BppXLfy9WH41JREN1f9ypEHDKom+Yisbpcx4X9GSllz5Q67BA\nMrpwzzl7Q1F5Dj8oQQcBHvVq7ja33/OpK09iH1Wi6hv+nnd3Pv/8NM3QhoMWFjos\ncwIDAQAB\n-----END PUBLIC KEY-----\n", "fingerprint": "EPhBiNvb5RAvM1FjzrrrKYP7ggMBaJ5wM7KMTJjBfPaM", "ca_pem": "-----BEGIN CERTIFICATE-----\nMIIDojCCAoqgAwIBAgIEBoqCUTANBgkqhkiG9w0BAQsFADBxMQswCQYDVQQGEwJH\nQjEUMBIGA1UEBwwLU291dGhhbXB0b24xGjAYBgNVBAoMEW5xdWlyaW5nTWluZHMg\nTHRkMTAwLgYDVQQDDCdjYS4xOTQ3NjYwYi1mYmMwLTQzNDUtYWVjNy0wM2IxNDdk\nNGU0MTcwHhcNMjIxMDI5MTcwNDIxWhcNMjMxMDI5MTcwNDIyWjBxMQswCQYDVQQG\nEwJHQjEUMBIGA1UEBwwLU291dGhhbXB0b24xGjAYBgNVBAoMEW5xdWlyaW5nTWlu\nZHMgTHRkMTAwLgYDVQQDDCdjYS4xOTQ3NjYwYi1mYmMwLTQzNDUtYWVjNy0wM2Ix\nNDdkNGU0MTcwggEiMA0GCSqGSIb3DQEBAQUAA4IBDwAwggEKAoIBAQDjfmahaIVG\ncMr+5RBwu7AK/648guDDL4w85SaChBQ2xmB4fZGMVmpa/gkCv7VXrsQNwvAiDGN3\n2l1h914cWgblni3uq+lsnQY+mPhKlCI35e59niH7F7kLvunG6Qcp3ODgqVwTVRq/\nGRGf+FB7+Mje1AOX33+LLTN2sKV9wYN5xMlP22HnreCBUa5eL4YnyJkxzqw2xhHm\n8xlwveomDH5Rh71EypjjAORuzwGmlct/L1YfjUlEQ3V/3KkQcMqib5iKxulzHhf0\nZKWXPlDrsEAyunDPOXtDUXkOPyhBBwEe9WruNrff86krT2IfVaLqG/6ed3c+//w0\nzdCGgxYWOixzAgMBAAGjQjBAMA8GA1UdEwEB/wQFMAMBAf8wDgYDVR0PAQH/BAQD\nAgEGMB0GA1UdDgQWBBSucRk3SzUBcmL5QaqMhyfbGTXCXTANBgkqhkiG9w0BAQsF\nAAOCAQEAsmk8vUGJjoy5ZAibthGUt5qYWwpdkWK1cARZQJY4Kpn/lSTZcPlTdEpi\nxEbUZ74IV/YENQaJAT6fV3DAi3xlwsTxnvJRX94orkh/hJxai1FvWq/CaNs6rz1d\nFji4t5iMmkF+77ZOD1mmnDnvlPW2yp3SuQ26+I8XxgMGnVeNo4aIbHpJoAwXh7l9\n6uUHPfNiIQxne2x0gK9uCAIfTbWLv4XkymSrbrEIicQHgTdWNg7r82lX+DC7zghW\nWYtmx/0v4cioBkBLmMVcqsUt29wWIkl/B6ATYIzPb/ibCtKF8NWvSbr5LxRWm52D\nIJEbj3HsC7sGSQKdGAEvg91nwh8fUw==\n-----END CERTIFICATE-----\n" } } ]}